If you have found yourself drawn to any of the apartments in "Only Murders in the Building", it probably says something about your personality. Check out what the design styles of Charles-Haden Savage, Oliver Putnam, or Mabel Mora says about you!
DIY FRIDAY: Garden Arbor
 If you know me at all, you know I’m a fanatic about our garden. Seriously. I probably spend 2-3 hours out there every day enjoying watching the vegetables, flowers and now grapes grow.
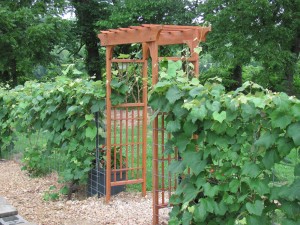
One thing that my husband and I recently added was an arbor entrance that will allow the grapevines to climb and cover the top. Although we purchased ours, it would be fairly simple to create your own for much less if you have a decent collection of tools (or know someone who would be willing to lend them), and scant materials. Maybe you even have leftover boards from a previous project!
The following instructions are from www.grampasworkshop.net and the more conversational instructions, written by Don Firth, can be found here, including reasoning for particular materials and inspiration for his design. I have attempted to convert this into more DIY-friendly instructions.

MATERIALS
- (2) 2 x 8 pressure treated boards for top
- (4) 2 X 2 x 10 pressure treated posts
- Several 1 x 4 pressure treated boards, to be ripped into 1″ strips, depending on your desired detail
- brass screws
- Jigsaw
- circular saw
MAKING THE TOP
Make a template and trace the design onto the ends of two 2 x 8’s, and then cut it out with a jigsaw, finishing it off by sanding smooth the edges if desired.
Using 2 x 2’s for the uprights, cut notches into the bottom of the top pieces into which the 4 uprights would fit. Secure these at the top by sinking 4″ brass screws down through the tops and into the tops of the uprights. 1″ strips (ripped when making the sides) should be added to the top to allow for more stability to the unit and to give more area for your vines to attach to, or to be threaded amongst.
THE SIDES
The sides were made by ripping 1x’s into 1″ wide strips with a circular saw. From those many 1″ strips, make 2 matching side assemblies…the cross members of which protruded by the thickness of the uprights – for a 2 x 2 that’s usually about 1 1/2″. Attach these protrusions with brass screws to the uprights of the unit – the means of attaching the side assemblies to the uprights.
 When ripping the lengths of 1x for the side pieces, decide on the width you wish them to be, and rip a whole bunch of strips the same width from some 1x boards you have purchased for this purpose. Then cut them to length, based on your design for the sides. Remember that the cross members of the sides will have to protrude by the thickness of the uprights, to be later screwed to the uprights as a means of attaching the sides to the assembly.
Decide how much clearance you want from the ground and from the top and build it accordingly. Regarding the spacing of the pieces, you probably want about 4″ horizontally and perhaps 8″ to 10″ vertically, to allow for easy threading of your vines through your “trellis type” sides. The spacing is not at all critical. It’s purely a matter of personal preference, as long as you allow the cross members to protrude appropriately, for a nice neat fit to the uprights.
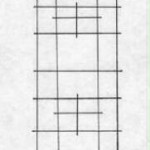
In the drawing, you can see how I made my side pieces, however the actual design is a matter of personal preference, as long as you allow the cross member pieces of your sides to protrude by the thickness of the main uprights of your unit. When they are screwed to those uprights during final assembly, your arbor will have a much neater look to it if they fit properly.
THE POSTS
The clearance for this example is 7 feet, therefore cut the 2 x 2 x 10′ pieces to 9′ long. Dig two 1/2′ deep holes in the ground for each upright, and fill each hole at the bottom with 6″ of gravel to allow for drainage so the bottoms would not be sitting in overly moist earth. If desired, coat the length of the uprights which would be in the ground with end cut preservative to protect against wood rot.
The unit was assembled completely before inserting in the holes. Upon insertion into the ground, fill the holes with earth or Quikrete making it reasonably square to the ground.


