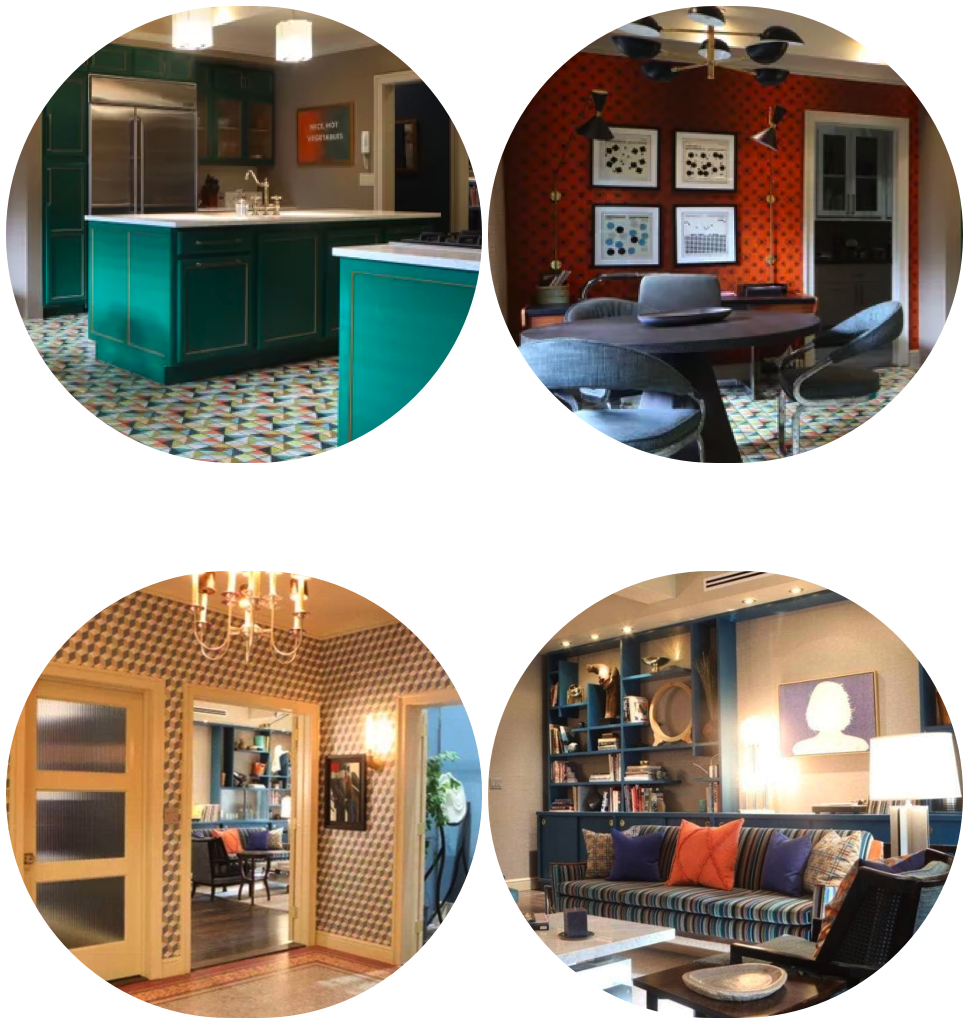
If you have found yourself drawn to any of the apartments in "Only Murders in the Building", it probably says something about your personality. Check out what the design styles of Charles-Haden Savage, Oliver Putnam, or Mabel Mora says about you!
DIY FRIDAY: Painting Upholstered Furniture
 I saved the best for last on my final BACK-TO-SCHOOL week post. I found this on Pinterest and think this idea is brilliant, especially for young apartment dwellers who have attained their furnishings through dumpster-diving (don’t act like you didn’t do it!), garage sales, or Aunt Susan’s cast-offs.
Thank you, Kristie of Hyphen Interiors, for allowing me to repost this! Great project!
•
Materials needed:
- 1 Quart of latex satin paint in the color of your choice
- 1 Spray bottle full of water
- 1 2 inch or smaller paint brush
- Fabric medium (equal to the amount of paint that you use)
- Acrylic craft paint in the color of your choice (should match the color of the Latex paint)
- Sand paper in around a 180 grit
Tutorial:
1. Make sure the chair is wiped free of dust and debris.
2. Mix 1:1 parts of latex paint and fabric medium. (I used Ocean Soul by Valspar.)
_thumb")
_thumb[3]")
Fabric medium keeps the fabric from getting too hard. Note: Some fabric mediums require that you place an iron briefly on the fabric (or a hair dryer) after the paint dries.
I wouldn’t use much paint – maybe 1/8 of the quart. I mixed mine in an old cup. A little goes a long way in this phase. This will be your base coat.
3. Water that down with 1/2 the amount of water as paint. Stir. It should look more like a glaze than a paint.
_thumb[7]")
4. Remove all seat cushions that are not attached from the chair.
5. Spritz (fine mist) the part of the chair you will start with first with water. I started on the seat cushion first. Don’t be shy, you want the fabric damp.
_thumb[4]")
6. Brush on the paint slowly blending the best you can. Finish the area going with the grain so the fabric lays in the right direction as it dries.
_thumb[1]")
7. This should give you light coverage, almost like a stain. It will also act as a primer.
8. Do two coats this way. Each should be VERY thin. Water it down more if you have to. Let the first one dry fully before beginning the second.
9. Don’t worry, your arm won’t fall off.
10. Sand any particularly rough parts. Lightly. In the direction of the grain mostly, if possible.
_thumb[2]")
11. Now, it’s time for a final coat using the acrylic paint. Mix it 1:1 with the fabric medium, like you did with the latex paint. I mixed this in a cup as well. But, this time, be more generous. I’d do a full cup this size. (See below.)
Add just a few thimbles of water to dilute it a little.
I had to mix my own color since the acrylic paints didn’t come in the color I wanted.
_thumb[2]-1")
Paint this layer much more generously. This will be the layer that will cover the chair more completely. Don’t glop it on, but be generous. It should provide full coverage unlike the base coats.
For more on the final decoration of this chair, please visit Kristie’s website.
FAQ & TIPS
Is it crunchy or stiff?
It started out as a velvet fabric. It is not soft like velvet anymore, but it is also not hard, crunchy or sand papery. It’s like a stiffer rougher fabric, similar to painted canvas. If you rub it in the direction of the grain, though, it’s not bad at all. If you rub it in the opposite direction, it’s more rough.
Does the paint come off on clothing?
Not at all. I tested it out and even wet it and sat on it. No problem. Similarly, if you paint a t-shirt, the paint doesn’t rub off.
•
TIPS
– A smoother fabric makes for a more consistent color.
– The final acrylic paint layer is very important. It will give the consistent deep color. Be sure not to overdo it on the latex paint.
– Go light on seams. Water this down and don’t overdo it.
– Sand down any particularly rough spots.
– For a more leather-like finish, you could try a glossy paint or a wax finish.
– It seems to work with just latex or just acrylic layers.
Related Posts